Connecting to Fortigate IPSec using Strongswan
by Rz1027
Background
IPSec (Internet Protocol Security) is a protocol suite for securing Internet Protocol (IP) communications by authenticating and encrypting each IP packet in a data stream. It is primarily used to create encrypted tunnels between secure and insecure networks.
If you are in an internal penetration test or just a Linux user that needs to jump into your company VPN, IPSEC might be the only available option. And for a Linux user like me, sometimes the option is not there as the case of Fortigate, who don’t support IPSEC from the Linux version of Forticlient VPN. I had to jump back and forth in Window’s VMs to connect to my company’s network, just because Fortigate don’t want to add this simple option.
To solve this problem we need to connect to the VPN service using lower level softwares. A lot are free and open source like openswan and vpnc, but for me I am gonna showcase Strongswan.
Familiarization
I wont dive a lot into the “Networking” theory of IPSEC, I’ll just go with the technical point of view and what each parameter means.
In my case I was connecting to a gateway using IPSEC IKEv1, where the types of authentication are PSK (preshared key) and XAUTH (extended authentication with a username and password). Thus my credentials will be:
- A gateway ip : lets say 123.123.123.123
- A preshared key : ABCDEFG
- A username and password pair -> username:password
- A local ID
The local ID is an extra piece of data sent in negotiation, it is used by gateway for more verification especially when multiple users on the same ip. (You might not have this in your configuration)
This is what Windows version of forticlient IPSEC configuration might look like:
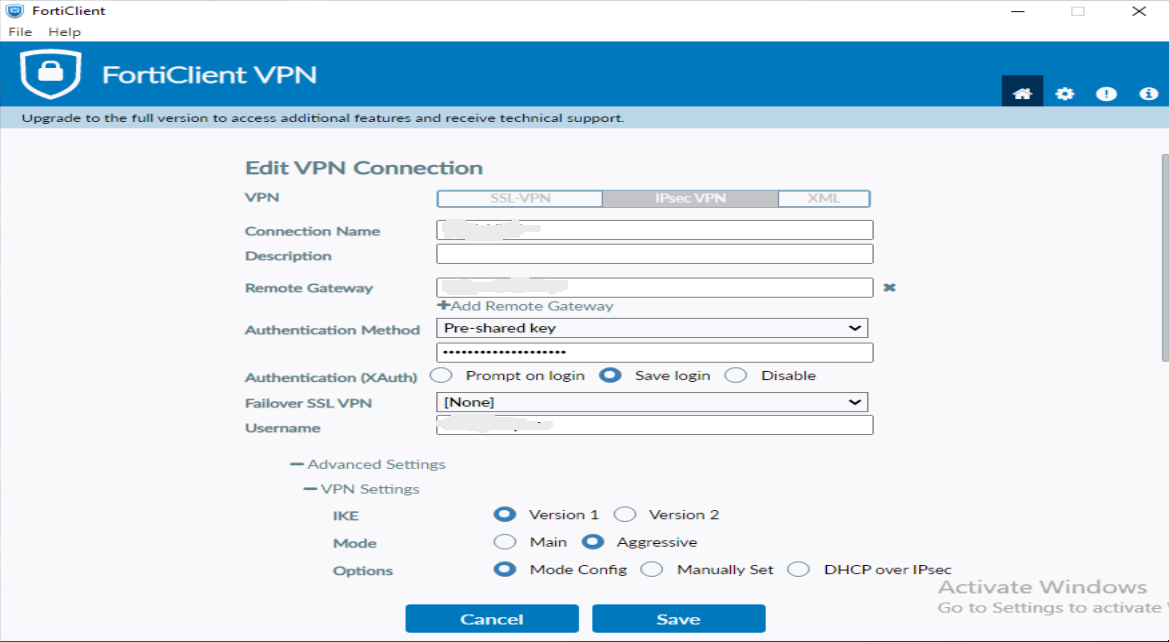
We need to translate such information into strongswan configuration.
To install strongswan you can use
pamac install strongswanon Arch based systems orsudo apt-get install strongswanon Ubuntu based systems
Strongswan has 2 important files:
-
/etc/ipsec.confExampleconn snt left= 10.11.11.1 leftid= chocolate leftsubnet= 10.0.1.0/24 right= 192.168.22.1 rightsubnet= 10.0.2.0/24 keylife= 80000s -
/etc/ipsec.secrets
The Process
A- First and before anything, open the corresponding ports in your firewall.
I wasted a lot of time trying while it was blocking everything, for example if you are using IPTables:
#Allow ike default port 500
sudo iptables -A INPUT -p udp --dport 500 -j ACCEPT
#Allow NAT-transversal default port if you want it
sudo iptables -A INPUT -p udp --dport 4500 -j ACCEPT
#Allow default esp port
sudo iptables -A INPUT -p esp -j ACCEPT
#Save the rules not to rerun everytime
sudo iptables-save > /etc/iptables/iptables.rules
#Set ipsec.secrets permissions
chmod 600 /etc/ipsec.secrets
B- Define your communication peers:
- Left: is a terminology used to mean your local pc or network side
- Right: is the side of the network you are connecting to
conn myIPSEC
    left=%defaultroute #Use my systems default route
    leftsourceip=%config
    leftauth=psk
    leftid=chocolate #Called Local ID in Windows FortiClient
    rightauth=psk
    leftauth2=xauth
    right= 123.123.123.123 #Gateway ip
    rightsubnet= 0.0.0.0/0 #Wont be such if a static ip is set

    xauth=client
    xauth_identity="username" #the Xauth user, password is in ipsec.secrets
-
leftsourceip=%configparameter is often used in IPsec VPN configurations. When specified, this setting means that the IP address for the local (left) end of the connection is to be obtained through configuration payloads during the IKE (Internet Key Exchange) phase. -
leftauth=pskandrightauth=pskdefines that the first step of authentication is PSK which is using the preshared key -
leftauth2=xauthdefines that the next step in authentication is xauth using a username and password pair. Don’t defined a rightauth2 since xauth is only your side to be in. -
xauth=clientoption specifies that this endpoint (in your case, your local client) should expect to perform XAUTH (Extended Authentication) as a client.
Note that changing any single parameter of these will either get the connection to fail or establish a successful connection but devices aren’t discoverable
C- Add some connection specific parameters:
    keyexchange= ikev1 #Depends on what protocol you choose
    ikelifetime= 86400s #Keylife in Phase 1
    keylife= 86400s #Keylife in Phase 2
    aggressive= yes #Very easy to miss
    ike= aes128-sha1-modp1536,aes256-sha256-modp1536
    esp= aes128-sha1-modp1536,aes256-sha1-modp1536
    auto= add
-
aes128-sha1-modp1536,aes256-sha256-modp1536Here we define the cryptographic suite we are using. Theike=andesp=lines specify the algorithms that your VPN connection uses for the key negotiation phase (Phase 1, represented by ike=) and the actual data encryption phase (Phase 2, represented by esp=). Each proposal represents a different set of encryption, hash, and DH group to use, and by listing multiple proposals, you’re telling the system that it can use any of these combinations. If you add ! after the proposals, it means that only the provided proposals should be used, rejecting other proposals. For example in phase 1 if we choose AES128 + SHA1 + DH group 5, the proposal should beaes128-sha1-modp1536. DH group corresponds to specific number of bits (in case of DH5 it is 1536 in the MODP group, check DH Groups and MODP -
auto=add, This means the connection will be loaded into memory but not started automatically. You have to manually start the connection using the command ipsec up.
D- Dead Pear Detection (Optional)
    dpdaction= clear
    dpddelay= 10s
    dpdtimeout= 30s
I have no idea how dead pear detection works but these are the corresponding parameters
Any ways combine all these chunks into one configuration object and then set the secrets.
E- Set the secrets
We set the secrets needed in /etc/ipsec.secrets , I use %any since I don’t have any other ipsec tunnel to use, but if you do have others you should specify the ip peers.
# ipsec.secrets - strongSwan IPsec secrets file

%any : PSK "ABCDEFG"
username : XAUTH "password"
Firing It Up
To set your connection up, you have to reset ipsec, reload the config, and then up the tunnel.
    ipsec restart
    ipsec update
    ipsec reload
    ipsec up myIPSEC
Troubleshooting
In case you had some problems I recommend some methods to debug the process:
- Add this chunk to
/etc/ipsec.confconfig setup charondebug="all"This increases the debug verbosity to the highest level so you could monitor what happens
-
Extract the XML configuration from Forticlient on Windows to check if you missed any parameter
- Extract the Debug type logs from Forticlient on Windows to monitor how the negotiation is happening
Conclusion
I successfully connected to my network’s IPSEC VPN after a long hassle. Please note that this case is specific to Fortigate IPSEC VPN, I explained the parameters so you could customize it in case you had a different scenario, but understanding the main blocks will help you construct any configuration you need.